Django 有着非常齐全的文档, 善用文档将能使学习事半功倍.
Django 文档
版本选择
3.2的LTS版本在21年的4月份发布, 会作为下一个主流版本, 这里从3.2版本进行学习.

安装
pip install django==3.2 |
创建项目
django-admin startproject mysite |
目录结构
mysite/ |
最外层的
mysite(根目录, 重命名无影响)manage.py
管理django项目的命令行工具, 和django-admin一样, 区别在于jango-admin加到系统环境变量中, 任意目录下可调用manage.py只能在该项目下使用
mysite(项目名)__init__.py
将当前目录识别为一个包settings.py
项目的配置文件urls.py
项目的URL声明wsgi.py
全称Web Server Gateway InterfaceWeb服务器网关接口只是一种通信协议, 它确立了两个规范
- 在服务器下开启多个web服务应用, 确定客户端请求如何到达服务应用的规范(从哪来)
- 服务应用如何把处理的结果返回的规范(到哪去)
asgi.py(另一种通信协议)
运行启动
# 指定8888端口启动, 不指定默认端口为8000 |
访问 http://127.0.0.1:8888 就可以看见初始页面了.
MTV模型
Django使用的是MTV模型, 知其所以然在之后学习上才不至于犯迷糊.

Model(模型)
django提供了一个抽象的模型层, 目的是为了构建和操纵当前Web应用的数据.
简单来说,
model层就是用来和数据库进行交互的.Django最出名的就是它的orm,Object Relational Mapping对象关系映射
Templat(模板)
View将数据传递给模板层进行渲染, 之后将渲染好的页面返回到客户端.
模板层提供了一个对设计者友好的语法用于渲染向用户呈现的信息.
View(视图)
视图层, 负责处理用户请求和响应, 处理业务逻辑的.
MVC模型

Django的MTV模型和MVC本质上是相同的, MTV 是 MVC 的一种细化, 将原来 MVC 中的 V 层拿出来进行分离, 视图的显示与如何显示交给 Template 层, 而 View 层更专注于实现业务逻辑.
其实在 Django 是有 Controller 层的, 只不过它由框架本身来实现, 所以我们不用关心它.
Django 更关注于M、T 和 V
创建应用
在项目目录下运行, 创建一个投票应用.
python manage.py startapp polls |
创建的应用才是处理请求和编写业务逻辑的地方.
目录结构
polls/ |
模型层
数据库配置
修改settings.py中的DATABASES, 默认是使用SQLite, 这里将它改成MySQL.
DATABASES = { |
Django使用的是mysqlclient, 这里将其改成熟悉的pymysql, 修改mysite\__init__.py, 添加以下代码
import pymysql |
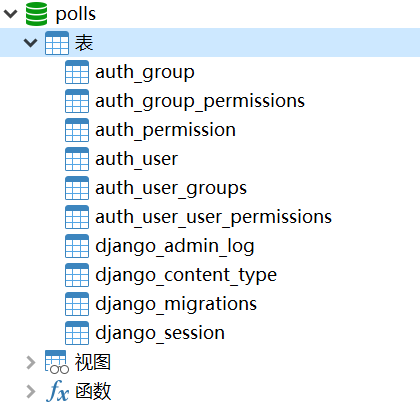
然后初始化数据库, 生成初始的管理表.
python manage.py migrate |
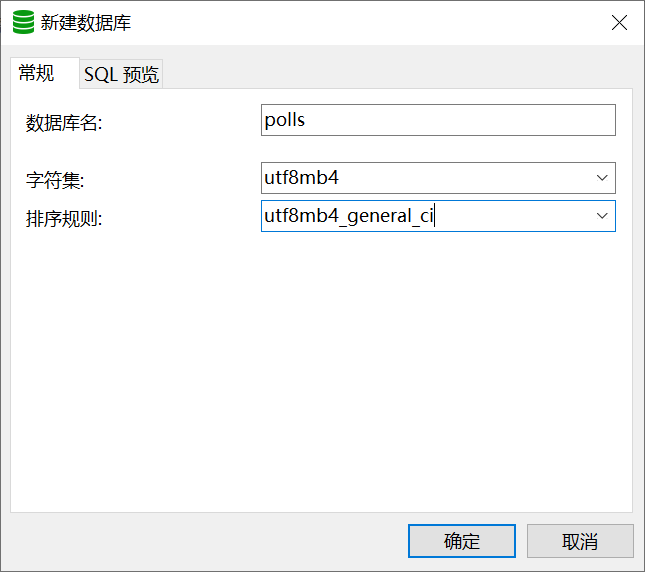
这里需要注意一个点, Django并不会自动帮我们建库, 如果直接运行的话, 会报错:
django.db.utils.OperationalError: (1049, "Unknown database 'polls'"), 表示没有polls这个数据库
这里手动建下库, 注意下字符集和排序规则.
建好后的表是这样子的.
创建模型
添加应用
修改polls/models.py, 添加投票应用, 这里创建Question、Choice两个模型.
from django.db import models |
激活模型
修改
settings.py, 激活APPINSTALLED_APPS = [
'polls.apps.PollsConfig', # 创建pollss
'django.contrib.admin',
'django.contrib.auth',
...
]同步本地模型修改
会在polls/migrations目录下创建一个迁移文件(操作类似git commit).python manage.py makemigrations polls
正式进行数据库同步(在数据库创建相应的表)
python manage.py migrate
使用
python manage.py sqlmigrate可以查看执行的SQL.python manage.py sqlmigrate polls 0001
这时候查看数据库才可以看到创建的表.
![]()

管理后台
安装依赖包, 用于密码加密处理
pip install cryptography
创建管理员账号
python manage.py createsuperuser
修改
polls/admin.py, 向管理页面加入投票应用from django.contrib import admin
from .models import Question
admin.site.register(Question)
测试一下
如果你之前没有关闭
Django的话, 会发现已经热更新代码了.
这时浏览器输入http://127.0.0.1:8888/admin进入管理后台.

登录后能看到已经添加的投票应用接口.

在这里进行添加下问题.

添加完后前往数据库看看,是不是新增了刚刚的问题呢.
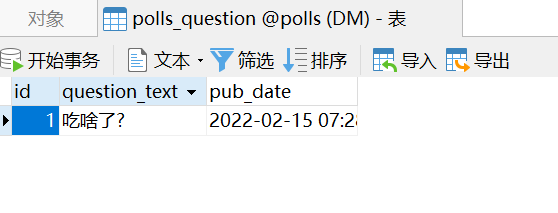
这得益于ORM, 这部分和数据库交互的操作不用我们手动实现.
对于个人开发者来说, 很是方便, 但对于如今前后端分离的大环境下,可能并没有那么给力, 当然, 这是后话了.
使用API
这里使用交互式命令行来感受下
Django里的一些内置API
终端运行
python manage.py shell |
导入项目下的包 |
这里输出的是类的信息, 这样没法第一眼就知道是什么, 这里为类添加__str__方法来处理这个问题.
from django.db import models |
进入交互命令行测试.
>> from polls.models import Question |
其它API操作也可以用相同方式进行调用.
视图层
上面完成了Model(模型层)的dome级学习, 接下来进行View(视图层)的学习.
可返回数据类型
- 文本
- 文件
- html
- css
- js
- 视频文件, 音频文件
- JSON数据格式
创建视图
polls/views.py视图是处理客户端请求的地方from django.http import HttpResponse
def index(request):
return HttpResponse("Hello, world. You're at the polls index.")使用路由解决不同请求调用不同的处理方法
修改
polls/urls.py, 来创建应用的路径管理from django.urls import path
from . import views
urlpatterns = [
path('', views.index, name='index'),
]修改
mysite/urls.py, 将应用的路径管理添加到全局配置当中from django.contrib import admin
from django.urls import include, path
urlpatterns = [
path('polls/', include('polls.urls')),
path('admin/', admin.site.urls),
]
测试访问 http://127.0.0.1:8888/polls 会显示什么吧.
添加视图
修改polls/views.py
from .models import Question |
添加路由
先了解下配置规则
URL匹配
path('<int:question_id>/', views.detail, name='detail'),
- int表示类型
question_id表示传递的参数名
URL配置(mysite/settings.py)
ROOT_URLCONF设置主URL配置文件.
把这些新视图添加进 polls.urls 模块里, 只要添加几个 url() 函数调用就行
from django.urls import path |
测试一下

模板层
一个正常的网站不会只有文字, 还需要有相应的UI界面, 这时候模板就上线了.
创建模板
首先, 在polls目录里创建一个templates目录, Django 将会在这个目录里查找模板文件, 然后在创建polls(对于相应的应用), 为了不造成命名空间污染.
完整路径应该是polls/templates/polls/index.html,添加内容,生成一个问题列表,然后根据相应问题id跳转到详情页.
{% if latest_question_list %} |
创建polls/templates/polls/detail.html, 添加内容, 打印当前问题内容列表.
<h1>{{ question.question_text }}</h1> |
关联对象API --- _set
Django 提供了从关联关系 另一边 访问的 API —— 从被关联模型到定义关联关系的模型的连接。
就如上,question对象能通过choice_set属性访问包含所有关联choice对象的列表。
添加模板
然后, 让我们更新一下 polls/views.py 里的来使用模板
from django.http import HttpResponse |
还有一种更优雅的写法, 使用django.shortcuts内的render()快捷函数, 来简化了loader和HttpResponse的编写流程.
from django.shortcuts import render |
这时候再看看页面,是不是样式就变了呢

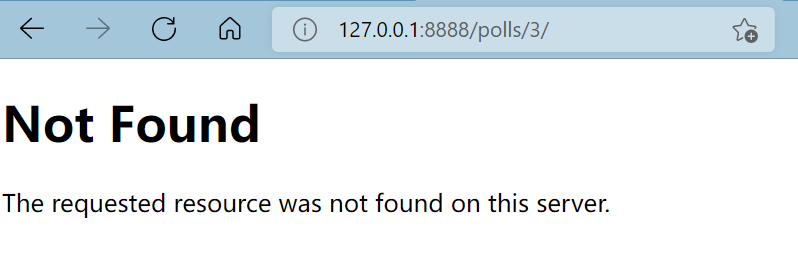
处理404
问题id没有对应数据时抛出404
from django.http import Http404 |
同样也有更简洁的写法, 使用get_object_or_404()
from django.shortcuts import get_object_or_404, render |
↑ pk 参数表示主键 "primary key", 是 Django 提供查询的快捷方式 ↑
测试之前先修改下设置
DEBUG = False # 关闭调试 |
测试一下, 默认返回会是这个样子, 但实际应用上很少有网站会给用户返回这样简陋的页面, 一般是会做重定向处理的.
重定向
使用HttpResponseRedirect()进行重定向.
from django.http import HttpResponseRedirect |
投票应用
接下来对这个投票应用进行完善, 熟悉下整体流程, 涉及具体的细节之后再深入.
修改polls/templates/polls/detail.html, 添加表单元素.
{% comment %} 这里使用软编码, url 代表当前的应用名 {% endcomment %} |
修改polls/templates/polls/results.html, 显示投票结果.
<h1>{{ question.question_text }}</h1> |
修改vote()方法, 实现完整的投票功能.
def vote(request, question_id): |
到了这一步, 其实已经完成了基础功能了, 但不要忘记了Question对应Choice还没有进行创建.
修改polls/admin.py, 配置后台管理, 用于添加Choice.
from django.contrib import admin |
进入后台管理, 修改相应的选项保存后就可以进行测试了.

测试一下

到此, 算是对
Django简单的入了个门, 下一篇文章详细讲讲Django中的模型层, 让咱们逐步深入ヾ(•ω•`)o